Grafiken zur Demonstration der Wahrscheinlichkeitsdominanz 2.Grades
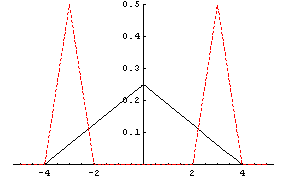
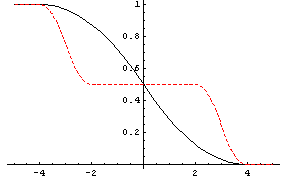
(Ergänzung zum Skriptum S.39)Die linke Seite zeigt Dichtefunktionen, die rechte Seite zeigt die zugehörigen Risikoprofile.
Das Risiko der rot gezeichneten Verteilung nimmt ab.
|
| |
| ||
|
|
|
|
Die linke Seite zeigt Dichtefunktionen, die rechte Seite zeigt die zugehörigen Risikoprofile.
Das Risiko der rot gezeichneten Verteilung nimmt ab.
|
|
| |
| ||
|
|
|
|
![[Graphics:stochdom2/stochdom2_15.gif]](stochdom2/stochdom2_15.gif)
![[Graphics:stochdom2/stochdom2_16.gif]](stochdom2/stochdom2_16.gif)
![[Graphics:stochdom2/stochdom2_17.gif]](stochdom2/stochdom2_17.gif)
![[Graphics:stochdom2/stochdom2_18.gif]](stochdom2/stochdom2_18.gif)
![[Graphics:stochdom2/stochdom2_19.gif]](stochdom2/stochdom2_19.gif)
![[Graphics:stochdom2/stochdom2_20.gif]](stochdom2/stochdom2_20.gif)
![[Graphics:stochdom2/stochdom2_21.gif]](stochdom2/stochdom2_21.gif)
![[Graphics:stochdom2/stochdom2_22.gif]](stochdom2/stochdom2_22.gif)
![[Graphics:stochdom2/stochdom2_23.gif]](stochdom2/stochdom2_23.gif)
![[Graphics:stochdom2/stochdom2_24.gif]](stochdom2/stochdom2_24.gif)
![[Graphics:stochdom2/stochdom2_25.gif]](stochdom2/stochdom2_25.gif)
![[Graphics:stochdom2/stochdom2_26.gif]](stochdom2/stochdom2_26.gif)
![[Graphics:stochdom2/stochdom2_27.gif]](stochdom2/stochdom2_27.gif)
![[Graphics:stochdom2/stochdom2_28.gif]](stochdom2/stochdom2_28.gif)
![[Graphics:stochdom2/stochdom2_1.gif]](stochdom2/stochdom2_1.gif)
![[Graphics:stochdom2/stochdom2_2.gif]](stochdom2/stochdom2_2.gif)
![[Graphics:stochdom2/stochdom2_3.gif]](stochdom2/stochdom2_3.gif)
![[Graphics:stochdom2/stochdom2_4.gif]](stochdom2/stochdom2_4.gif)
![[Graphics:stochdom2/stochdom2_5.gif]](stochdom2/stochdom2_5.gif)
![[Graphics:stochdom2/stochdom2_6.gif]](stochdom2/stochdom2_6.gif)
![[Graphics:stochdom2/stochdom2_7.gif]](stochdom2/stochdom2_7.gif)
![[Graphics:stochdom2/stochdom2_8.gif]](stochdom2/stochdom2_8.gif)
![[Graphics:stochdom2/stochdom2_9.gif]](stochdom2/stochdom2_9.gif)
![[Graphics:stochdom2/stochdom2_10.gif]](stochdom2/stochdom2_10.gif)
![[Graphics:stochdom2/stochdom2_11.gif]](stochdom2/stochdom2_11.gif)
![[Graphics:stochdom2/stochdom2_12.gif]](stochdom2/stochdom2_12.gif)
![[Graphics:stochdom2/stochdom2_13.gif]](stochdom2/stochdom2_13.gif)
![[Graphics:stochdom2/stochdom2_14.gif]](stochdom2/stochdom2_14.gif)